Homelab Adventures: Solving the Networking Puzzle with Dual-Stack IPv4 and IPv6
Welcome back to Homelab Adventures! This is day 2, we’re tackling one of the most satisfying (and occasionally hair-pulling) challenges in homelab networking: creating a dual-stack IPv4/IPv6 private subnet inside a Proxmox VM that’s itself nested under Hyper-V.
Why? Imagine running a K8s cluster where pods communicate over IPv6 while legacy services still rely on IPv4. Or hosting microservices that are ready for the future. Let’s solve this puzzle!
The Scenario: A Triple-Level Networking Cake
- Host Windows 10 + Hyper-V (level 1): Provides an Internal Switch with ICS on 192.168.10.1 (IPv4). The Proxmox VM (level 2) gets 192.168.10.10 from this network.
- Proxmox VM (Level 2): Has vmbr0 with IPv4 192.168.10.10/24, gateway 192.168.10.1. Creates vmbr1 for private IPv4 and ULA IPv6, uses nftables for NAT, and runs dnsmasq for DHCP and RA services.
- Guest VMs / LXCs (Level 3): Attach to vmbr1, receive DHCP for IPv4 and SLAAC/DHCPv6 for IPv6, and communicate internally and externally via NAT.
The goal? Let your inner VMs/LXCs:
- Get IPv4 (192.168.200.x) and IPv6 ULA (fdc0:1234:abcd::/64) addresses automatically.
- NAT out to the internet via Proxmox’s vmbr0.
- Avoid Hyper-V MAC spoofing issues by keeping everything behind Proxmox’s single NIC.
Step 1: Ensure Your Current Proxmox Network (vmbr0) is Working
ip a show vmbr0
ping -c 3 8.8.8.8
ping -c 3 google.com
Step 2: Create vmbr1 for Private IPv4 + IPv6
2.1 Add Configuration
Append to /etc/network/interfaces:
auto vmbr1
iface vmbr1 inet static
    address 192.168.200.1/24
    bridge-ports none
    bridge-stp off
    bridge-fd 0

iface vmbr1 inet6 static
    address fdc0:1234:abcd::1/64
2.2 Bring Up the Interface
Pro Tip: Generate a random ULA with openssl rand -hex 5 to avoid conflicts. Restart networking:systemctl restart networking
ip addr show vmbr1 # Verify both IPs exist Step 3: Enable IP Forwarding
3.1 Edit /etc/sysctl.conf to ensure:
net.ipv4.ip_forward=1
net.ipv6.conf.all.forwarding=1
3.2 Apply the changes:
sysctl -pThis allows traffic forwarding/routing between interfaces for both IPv4 and IPv6.
Step 4: Configure nftables for Dual-Stack NAT
Why nftables? It’s modern, flexible, and replaces iptables. We’ll use it to masquerade traffic from vmbr1 to vmbr0.
4.1 Install nftables
apt-get install nftables -y
4.2 Configure /etc/nftables.conf
#!/usr/sbin/nft -f
flush ruleset

# ----- IPv4 NAT table -----
table ip nat {
    chain prerouting {
        type nat hook prerouting priority 0; policy accept;
        # (Optional) Add DNAT rules here for port forwarding
        # e.g. tcp dport 2222 iif "vmbr0" dnat to 192.168.200.50:22
    }

    chain postrouting {
        type nat hook postrouting priority 100; policy accept;
        # Masquerade IPv4 from 192.168.200.0/24 going out vmbr0
        ip saddr 192.168.200.0/24 oif "vmbr0" masquerade
    }
}

# ----- IPv6 NAT table (NAT66, optional) -----
NAT66 is non-standard and the upstream doesn't provide public IPv6, this won't truly give global v6 access. Skip it since we only need internal ULA.
4.3 Apply the Configuration
nft -f /etc/nftables.conf
nft list ruleset
4.4 Fix the “Interface Does Not Exist” Error
Proxmox starts nftables too early, before vmbr0 exists. Solve this with a custom service
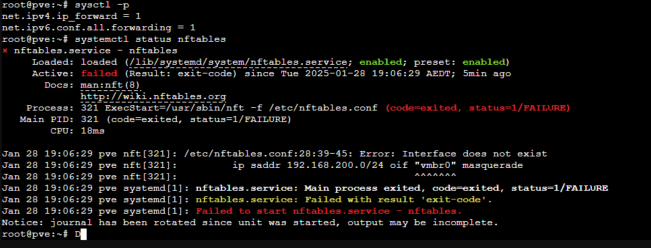
4.4.1 Create a Wait Script
For instance, /usr/local/bin/wait-for-vmbr0.sh:
#!/bin/bash
while ! ip link show vmbr0; do sleep 1; done
systemctl restart nftables
4.4.2 Make it executable
chmod +x /usr/local/bin/wait-for-vmbr0.sh4.4.3 Create a Systemd Service
For instance, /etc/systemd/system/nftables-late.service:
[Unit]
Description=Load nftables rules after vmbr0 is up
After=network.target pve-firewall.service
Wants=network.target pve-firewall.service

[Service]
Type=oneshot
ExecStart=/usr/local/bin/wait-for-vmbr0.sh
RemainAfterExit=yes

[Install]
WantedBy=multi-user.target
4.4.4 Enable and Start the Service
systemctl daemon-reload
systemctl enable nftables-late.service
systemctl start nftables-late.service
On boot, this service will run your script, wait for vmbr0, then apply the nft rules
Step 5: Install dnsmasq for DHCP
apt-get install dnsmasq -y5.1 Edit configuration for /etc/dnsmasq.d/vmbr1.conf:
# Listen on vmbr1 only
interface=vmbr1

# ---- IPv4 DHCP ----
# IP range in 192.168.200.x
dhcp-range=192.168.200.100,192.168.200.200,12h
# Gateway (router) option
dhcp-option=3,192.168.200.1
# DNS server for IPv4 clients
dhcp-option=6,8.8.8.8,1.1.1.1

# ---- IPv6 DHCP/RA ----
# ULA prefix: fdc0:1234:abcd::/64
# For SLAAC + RA:
# Provide addresses from e.g. fdc0:1234:abcd::100 to ...::200
dhcp-range=::100,::200,constructor:vmbr1,64,12h
# Optionally advertise your gateway's IPv6 address as DNS
dhcp-option=option6:dns-server,[fdc0:1234:abcd::1]
5.2 Enable & Start dnsmasq:
systemctl enable dnsmasq
systemctl start dnsmasq
Now, your VMs/LXCs will get IPv4 and IPv6 addresses automatically!
Step 6: Validate setup with a VM/LCX
6.1 Create a LXC attached to vmbr1
pct create 101 local:vztmpl/debian-12-standard_12.7-1_amd64.tar.zst \
      --hostname mycontainer \
      --net0 name=eth0,bridge=vmbr1,ip=dhcp \
      --storage local-lvm \
      --cores 1 --memory 512
6.2 Validate Connectivity
pct start 101 #to start the container
pct enter 101 #to enter the container
ip addr show
ping 192.168.200.1
ping 8.8.8.8
Step 7: (Optional) Port Forwarding
For inbound connections to a particular container/VM from the 192.168.10.x network (or outside), add a DNAT rule in the prerouting chain for IPv4 or IPv6. For instance, in /etc/nftables.conf:
table ip nat {
      chain prerouting {
          type nat hook prerouting priority 0; policy accept;
          # Forward host port 2222 on vmbr0 to container 192.168.200.101:22
          tcp dport 2222 iif "vmbr0" dnat to 192.168.200.101:22
      }
      chain postrouting {
          type nat hook postrouting priority 100; policy accept;
          ip saddr 192.168.200.0/24 oif "vmbr0" masquerade
      }
  }
Then you can SSH from your Hyper-V host at 192.168.10.10:2222 → container 192.168.200.101:22.
Why Bother? The Bigger Picture
- Kubernetes: Run dual-stack clusters to test modern CNI plugins.
- Isolation: Your Hyper-V host only sees Proxmox’s MAC, avoiding security headaches..
- Future-Proofing: Experiment with IPv6 services today, even without ISP support
Troubleshooting Quick Tips
- No IPv6 RA: Check dnsmasq logs with
journalctl -u dnsmasq. - NAT Failure: Verify
nft list rulesetand ensurevmbr0is the correct outbound interface. - DHCP Timeouts: Ensure
vmbr1is up and firewall rules aren’t blocking DHCP (port 67/68).
Wrapping Up
After days of trial, error, and way too much coffee, I’ve emerged on the other side of this dual-stack puzzle—bruised but victorious. Building this setup taught me more about IPv6, NAT quirks, and dnsmasq’s dark magic than any tutorial ever could. And guess what? It works. My budget laptop now hums with nested Proxmox, IPv4/IPv6 harmony, and a private subnet that’s begging for prototyping cloud-native solutions.
The real win? Understanding the guts of networking well enough to automate it. Soon, I’ll drop an Ansible playbook to replicate this config with a single command—because let’s face it, automation only shines when you’ve manually wrestled the beast first.
What is next? Stay tuned for Part 3, where we’ll dive into the world of K8s, microservices, IoT simulations, and the joys of experimentation. Until then, keep breaking things (responsibly). The homelab grind never sleeps. 🚀
Homelab Adventures continues…